- 03-5820-1777平日10:00〜18:00
- お問い合わせ
コラム
[Vue.js]Vuexのaction内で非同期処理を適用する例
Vuexのactionは非同期処理を含む事が出来るので、今回はaction内で非同期処理を通してのstateへのアクセスする
サンプルアプリケーションを作成してみたいと思います。
サーバ側はSpringBootを使用します。
開発環境
Windows10 Enterprise
npm 8.1.2
node 16.13.2
Java11
アプリケーション動作イメージ
上記がアプリケーションの動作イメージです。
アプリケーションのイメージを図にすると下記のようになります。
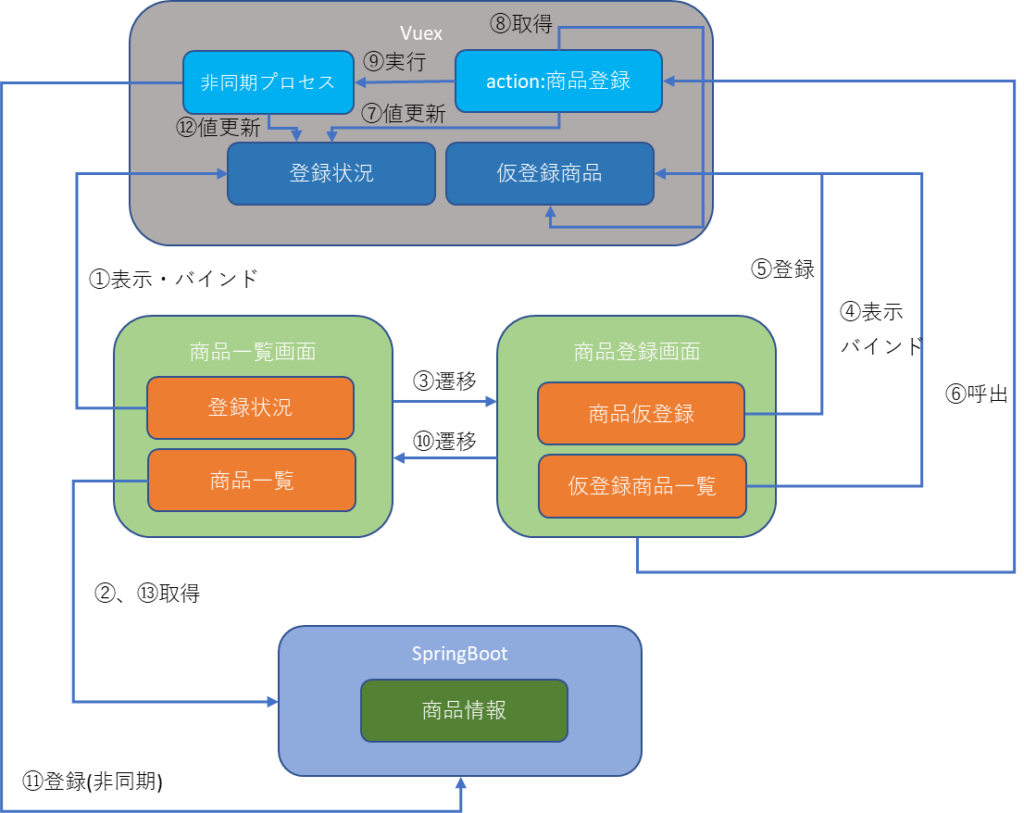
① Vuexの登録状況( 「処理中」又は「登録完了」)を表示・バインドします。バインドしているので値が変更される
と表示も更新されます。初期値は空文字です。
② SpringBootから商品情報すべてを取得し表示します。初期表示は何も表示されません。
③ 商品登録画面に遷移します。
④ 仮登録商品を表示・バインドします。バインドしているので値が変更される
と表示も更新されます。初期表示は何も表示されません。
⑤ 仮商品情報を登録します。Vuex上に後にSpringBootに登録する商品情報を複数管理しておきます。
⑥ 本登録ボタンが押下されたら、Vuexの商品登録actionを呼び出します。このactionで登録状況の更新、登録の
非同期処理等を行います。
⑦ 登録状況を「処理中」に変更します。
⑧ 仮登録商品を取得します。
⑨ axiosプロセスを立ち上げ、仮登録商品を渡しSpringBootへの登録処理を依頼します。非同期処理になります。
⑩ 登録画面から商品一覧画面へ遷移します。この時、画面の登録状況は「処理中」になっています。
⑪ SpringBootへの登録処理をします。
⑫ 登録処理が終了したら、Vuexの登録状況を「登録完了」にします。画面の表示も自動的に更新されます。
⑬ 更新ボタンを押下するとSSpringBootから商品情報すべてを取得し表示します。登録した商品が表示されます。
SpringBootプロジェクト
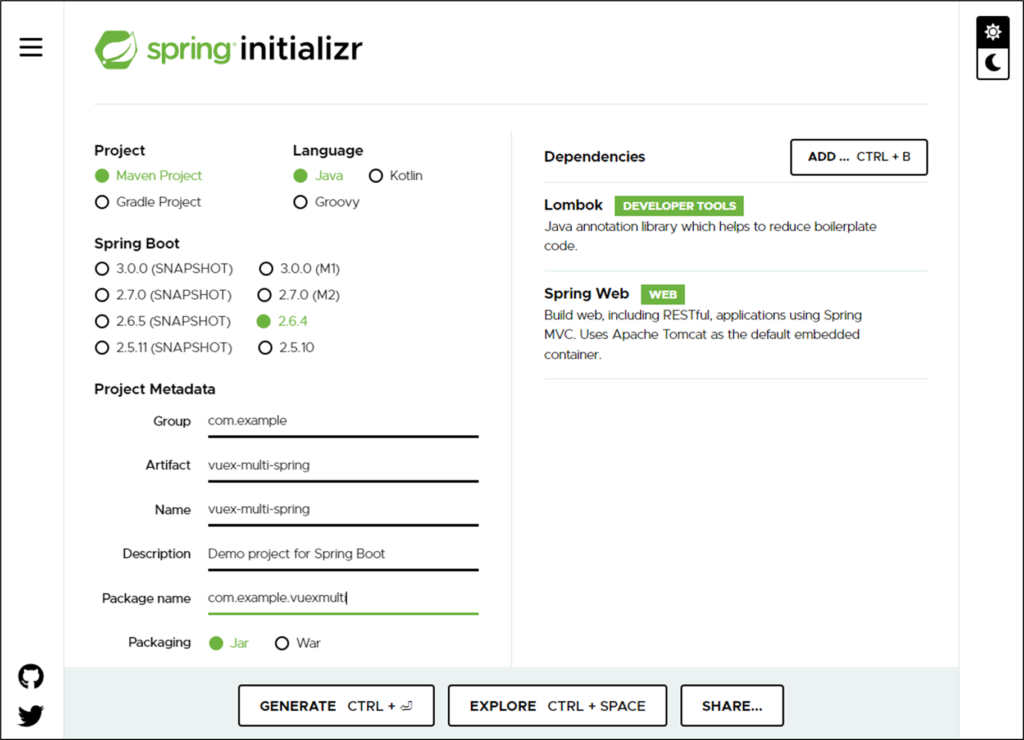
プロジェクト作成
https://start.spring.io/でSpringBootプロジェクト作成(eclipse等の開発ツールで作成するのも可です)
実装説明
・ディレクトリ構成
axios-spring/
           ├─ src/
           ├─ main/
                      ├─ java/com/example/vuexmulti/
                                                   ├─ ac/GoodsController.java ←作成する
                                                   ├─ servie/
                                                            ├─ Goods.java ←作成する
                                                            ├─ GoodsService.java ←作成する
                                                   ├─ VuexMultiApplication.java
                      ├─ resource/
                                ├─ static/
                                ├─ templates
                                ├─ application.properties
                ├─ test/
           ├─ target/
           ├─ HELP.md
           ├─ mvnw
           ├─ mvnw.cmd
           ├─ pom.xml
・service/Goods.java
package com.example.vuexmulti.service;

/**
 * 商品情報クラス
 */
public class Goods{
	private String code;
	private String name;
	private String category;

	public Goods(){
	}

	public Goods( String code, String name, String category){
		this.code = code;
		this.name = name;
		this.category = category;
	}
	public String getCode() {
		return code;
	}
	public void setCode(String code) {
		this.code = code;
	}
	public String getName() {
		return name;
	}
	public void setName(String name) {
		this.name = name;
	}
	public String getCategory() {
		return category;
	}
	public void setCategory(String category) {
		this.category = category;
	}
}
商品情報を保管するクラスです。
・service/GoodsService.java
package com.example.vuexmulti.service;

import java.util.*;

import org.springframework.context.annotation.Scope;
import org.springframework.core.io.ClassPathResource;
import org.springframework.stereotype.Service;
import javax.annotation.*;

/**
* 商品の取得、追加を行うサービス
**/
@Scope("singleton")
@Service
public class GoodsService {

	private List<Goods> goodsList = new ArrayList<Goods>();

	/**
	 * 商品情報を取得するメソッド
	**/
	public Goods[] getGoods(){
		return goodsList.toArray( new Goods[]{} );
	}

	/**
	 * 商品情報を登録するメソッド
	**/
	public void registGoods( Goods goods ){
		goodsList.add( goods );
	}

}
商品情報の登録、取得機能を持つクラスです。アノテーションでsingletonを定義しているので、登録した商品情報
はSpringBootが起動している間は消えません。
・ac/GoodsController
package com.example.vuexmulti.ac;

import java.lang.*;
import org.springframework.beans.factory.annotation.Autowired;

import org.springframework.web.bind.annotation.RequestMapping;
import org.springframework.web.bind.annotation.RequestMethod;
import org.springframework.web.bind.annotation.RequestBody;
import org.springframework.web.bind.annotation.RestController;
import org.springframework.web.bind.annotation.PostMapping;
import com.example.vuexmulti.service.GoodsService;
import com.example.vuexmulti.service.Goods;

@RestController
@RequestMapping("/goods")
public class GoodsController {

	@Autowired
	private GoodsService goodsService; ①
    /**
     * 商品情報リストを取得
     * @return
     */
    @RequestMapping(value = "/list", method = RequestMethod.GET) ②
    public Goods[] getGoodsList() {
    	return goodsService.getGoods();
    }

	/**
	* 商品情報登録
	* @return 結果
	*/
	@RequestMapping(value = "/regist", method = RequestMethod.POST) ③
	public String regist( @RequestBody Goods[] goodsList ){

		//5秒間待機
		try{
			Thread.sleep(5000);
		}catch(Exception e){}

		for( Goods goods : goodsList ){
			goodsService.registGoods( goods );
		}
		return "Success";
	}
}
商品情報の取得、登録機能を持つRESTコントローラクラスです。
① goodsServiceクラスのインスタンスを自動的に設定しています。SpringのDI機能を使用しています。
② 登録した商品情報をすべて取得するRESTメソッドです。goodsServiceから取得しています。
③ 複数の商品情報の登録処理をするRESTメソッドです。goodsServiceの登録メソッドを呼んでいます。
少し時間をかけたいので5秒間待機するコードを入れています。
ビルド・起動
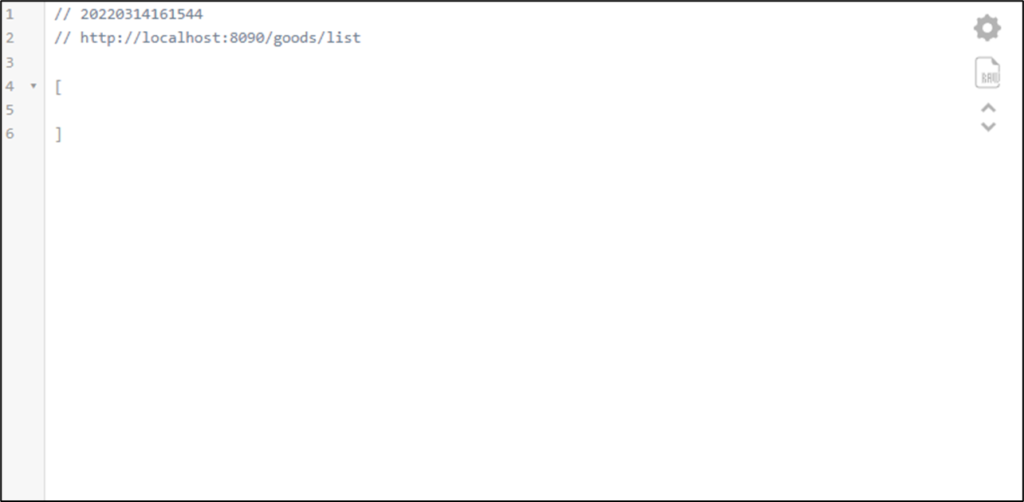
準備が出来たのでSpringBootを起動して正常に動作するかブラウザでアクセスしてみたいと思います。
axios-springディレクトリに移動し次のコマンド実行
./mvnw clean spring-boot:run起動したらブラウザでhttp://localhost:8080/goods/listにアクセス
以下の様な情報が表示されたら正常に実行されています。(商品情報を登録したないので何も返ってきません)
Vue.jsプロジェクト
プロジェクト作成コマンド
vue create vuex-multi-sampleプロジェクト種別選択
? Please pick a preset:
  ss ([Vue 3] node-sass, babel, router, eslint)
  router-sample ([Vue 2] babel, router, eslint)
  vuex-sample ([Vue 2] babel, router, vuex, eslint)
  Default ([Vue 2] babel, eslint)
  Default (Vue 3) ([Vue 3] babel, eslint)
> Manually select features
使用プラグイン選択(RouterとVuexを追加)
>(*) Choose Vue version
 (*) Babel
 ( ) TypeScript
 ( ) Progressive Web App (PWA) Support
 (*) Router
 (*) Vuex
 ( ) CSS Pre-processors
 (*) Linter / Formatter
 ( ) Unit Testing
 ( ) E2E Testing
Vue.jsのバージョン選択(今回は3.x)
  2.x
> 3.x
構文チェック機能等選択(ESLint with error prevention onlyを選択)
> ESLint with error prevention only
  ESLint + Airbnb config
  ESLint + Standard config
  ESLint + Prettier
・動作確認
プロジェクト作成が完了したらとりあえず動かし見ます。
cd vuex-multi-sample
npm run serve
コマンド起動後 http://localhost:8080 にアクセス。
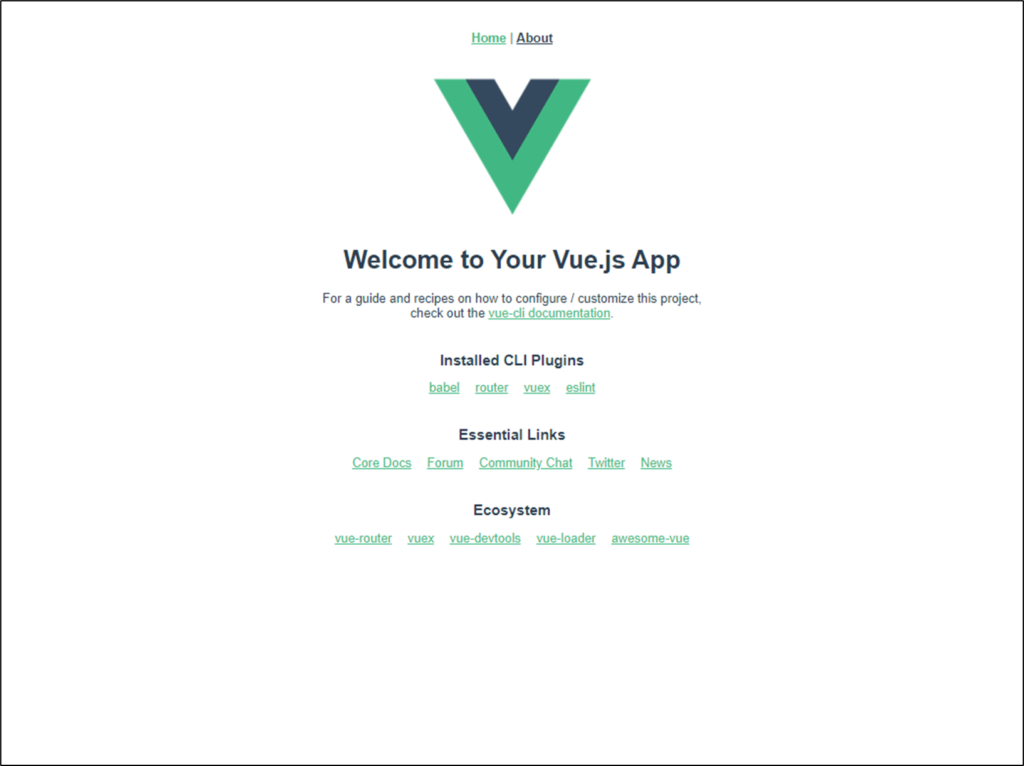
以上の様な画面が表示されていれば正常にプロジェクト作成が完了してます。
上記のプラグインだけだとリロード時に保管したデータが消えてしまうのでvuex-persistedstateというプラグインをインストールする必要があります。
npm install --save vuex-persistedstate実装説明
・ディレクトリ構成
vuex-sample/
           ├─ node_modules/
           ├─ public/
           ├─ src/
           ├─ assets/
             ├─ style.css ←作成
                ├─ components/
                ├─ store/
             ├─ index.js ←作成
                ├─ router/
             ├─ index.js ←作成
                ├─ views/
             ├─ GoodsList.vue ←作成
             ├─ RegistGoods.vue ←作成
                ├─ App.vue ←更新
                ├─ main.js ←更新
           ├─ babel.config.js
           ├─ package.json
           ├─ package-lock.json
           ├─ README.md
style.css、App.vue、main.js、router/index.jsについての説明は割愛します。
ソースを見たい方は此方から取得できます。
・store/index.js
Vuex用の定義情報を記述します。状態管理する変数やそれを操作するメソッド等を定義します。
import Vuex from 'vuex'
import createPersistedState from 'vuex-persistedstate'
import * as axios from 'axios'


export default new Vuex.Store({
  state: { ①
    registStatus:'',
    goodsList:[]
  },
  mutations: {②
	  kariRegistGoods: function(state, value){
		  let goods = {'code':value.code, 'name':value.name, 'category':value.category}
		  state.goodsList.push( goods )
    },
	  clearKariRegistGoods: function(state){
		  state.goodsList = []
    },
    setRegistStatus: function(state, value) {
      state.registStatus = value
    },
  },
  actions: { ③
    kariRegistBook: function( { commit }, goods ){
		  commit( "kariRegistGoods", goods );
	  },

    registBook: function({ commit }){
      commit('setRegistStatus', "処理中")
		   axios.post('http://localhost:8090/goods/regist', this.state.goodsList)
			    .then(response => {
			        if( response.data == "Success" ){
				          commit('clearKariRegistGoods')
				          commit('setRegistStatus', "登録完了")
			        }else{
				          commit('setRegistStatus', "登録エラー")
			        }
		     })
	    }
    },

  modules: {},
  plugins: [createPersistedState( {
    storage: window.sessionStorage
  }
  )]
})| No | 説明 | 変数・メソッド | 変数・メソッド説明 |
|---|---|---|---|
| ① | stateの宣言をします。 | registStatus | 登録状況 |
| goodsList | 仮登録商品リスト | ||
| ② | mutationsを定義します。 | kariRegistGoods | 仮登録商品をstateのgoodsListに追加します。 |
| clearKariRegistGoods | stateのgoodsListをクリアします。 | ||
| setRegistStatus | stateのregistStatus値を引数の値に変更します。 | ||
| ③ | actionsを定義します。 | kariRegistBook | 仮登録商品を追加します。mutationsのkariRegistGoodsを呼びます。 |
| registBook | 仮登録商品リストをSpringBootに渡し、登録処理を依頼します。 1.registStatusを「処理中」に更新 2.axios.postで仮登録商品リスト登録依頼をします。 3.axios.post部分の処理が非同期になります。 処理が返ってきたら、registStatusを更新します。 |
・views/GoodsList.vue
<template>
			登録状況:{{ $store.state.registStatus }}<br/><br/> ①
		 <button v-on:click="registGoods">商品登録</button><button v-on:click="getGoods">表示更新</button>②
			<br/><br/>
			<center>
		<div class="th-sticky_wrap">

			<table class="st-tbl1"> ③
				<thead>
					<tr>
						<th>コード</th>
						<th>名称</th>
						<th>カテゴリ</th>
					</tr>
				</thead>
				<tbody>
					<tr v-for="(goods) in goodsList" v-bind:key="goods.code">
						<td>{{ goods.code}}</td>
						<td>{{ goods.name }}</td>
						<td>{{ goods.category }}</td>
					</tr>
				</tbody>
			</table>

		</div>
			</center>

</template>

<script>
import * as axios from 'axios'

export default {
	components: {
	},
	name: 'GoodsList',
	data: () => ({
		goodsList: [] ④
	}),
	mounted () {
		this.getGoods() ⑤
	},
	methods: {
		registGoods: function(){ ⑥
			this.$router.push( "/regist" )
		},
		getGoods: function(){ ⑦
			axios.get('/goods/list')
				.then(response => {
				this.goodsList = response.data
			})
		}
	}
}
</script>
商品情報一覧画面のファイルです。SpringBootの商品情報の表示、登録状況の表示などをする画面です。
① VuexのstateのregistStatus(登録状況)を表示します。
② 商品情報登録画面への遷移ボタン、商品情報一覧更新ボタンを用意します。registGoods、getGoods
ファンクションを呼んでいます。
③ 商品情報一覧を表示します。goodsList変数の情報を使用しています。
④ SpringBootから取得した商品情報を格納します。
⑤ 画面表示時にgetGoodsファンクションを使用してSpringBootから商品情報を取得します。
⑥ 商品情報登録画面への遷移するファンクションを定義しています。
⑦ axiosのgetメソッドを使用してSpringBootから商品情報取得しgoodsListに格納します。
・views/RegistGoods.vue
<template>
	<center>
	<div class="view-div">
		<h2>仮商品仮登録</h2>
		<center>
		<table> ①
			<tr>
				<td>商品コード</td>
				<td><input type="text" v-model="goods.code"></td>
			</tr>
			<tr>
				<td>商品名</td>
				<td><input type="text" v-model="goods.name"></td>
			</tr>
			<tr>
				<td>商品カテゴリ</td>
				<td><input type="text" v-model="goods.category"></td>
			</tr>
		</table>
		</center><br/>
		<button v-on:click="kariRegist">仮登録</button><button v-on:click="prev">戻る</button><br/><br/> ②
	</div>

	<div class="view-div">
		<h2>仮商品登録リスト</h2>
		<div class="th-sticky_wrap"> ③
			<center>
				<table class="st-tbl1">
					<thead>
						<tr>
							<th>コード</th>
							<th>名称</th>
							<th>カテゴリ</th>
						</tr>
					</thead>
					<tbody>
						<tr v-for="(goods) in $store.state.goodsList" v-bind:key="goods.code">
							<td>{{ goods.code}}</td>
							<td>{{ goods.name }}</td>
							<td>{{ goods.category }}</td>
						</tr>
					</tbody>
				</table>
			</center><br/>
			<button v-on:click="regist">本登録</button><br/><br/> ④
		</div>
	</div>
	</center>
</template>
<script>
	export default {
		name: 'RegistGoods',
		data: () => ({
			goods : {code:'',name : '',category : ''} ⑤
		}),
		methods: {
			kariRegist: function(){ ⑥
				this.$store.dispatch('kariRegistBook', this.goods)

			},
			regist: function(){ ⑦
				this.$store.dispatch('registBook')
				this.$router.push( "/" )
			},
			prev : function(){ ⑧
				this.$router.push( "/" )
			}
		}

	}
</script>
仮商品情報登録、仮商品情報一覧表示をする画面です。
① 仮登録商品情報を入力するテキストボックスを用意します。goodsとバインドさせています。
② 仮登録ボタン、戻るボタンを用意します。kariRegist、prevファンクションが呼ばれます。
③ 仮登録商品情報リストです。vuexのstateのgoodsListの情報を表示しています。
④ 本登録ボタンを用意します。registファンクションが呼ばれます。
⑤ 仮登録商品情報を入力するテキストボックスとバインドする変数です。
⑥ 仮登録ボタン押下時に呼ばれ、vuexのactionのkariRegistBookを呼びます。vuexに仮登録商品として追加されます
⑦ 本登録ボタン押下時に呼ばれ、vuexのactionのregistBookを呼びます。vuexの仮登録商品リストをSpringBoot側に
登録します。
⑧ 戻るボタン押下時に呼ばれ、商品情報一覧画面に戻ります。
SpringBoot内にVue.jsプロジェクト配置
Vue.jsプロジェクトビルド
SpringBoot内にVue.jsプロジェクトを配置するのはビルドをする必要があります。以下のコマンドを実行します。
npm run build※Windowsでビルドが上手くできなかった場合はPowerShellのVersionを7以上にしてやって見て下さい。
ビルドに成功するとdistディレクトリが作成されます。
ビルド後Vue.jsプロジェクト配置
ビルドしたdistディレクトリ以下のファイル・ディレクトリをSpringBootの「src\main\resources\static」以下に
コピーしてください。
SpringBootビルド・起動
起動
./mvnw clean spring-boot:run起動したらブラウザでhttp://localhost:8080/にアクセス。
以上がVuexのaction内で非同期処理を適用する例の説明でした。
この用に状態管理をしつつある程度長い処理をする際に、action内での非同期処理が有効だと思われます。
今回使用したソースは此方から取得できます。
続けてお読みください
この記事をシェアする
お電話でのお問い合わせ
03-5820-1777(平日10:00〜18:00)